vegetarian

tofu (or tempeh) banh mi

Fast, fresh, flavourful, nutritious, delicious AND vegan - how can a sandwich be all these things at once?

One of my favourite places to grab lunch in town is the Banh Mi Grill - they do their vegan one with mushrooms and it’s pretty fabulous. I decided to make it myself at home with tempeh - as Tommy, bless him, isn’t the biggest fan of mushrooms - and it was so good, and fast to put together. I’ve since made this sandwich several times, with both tofu and tempeh and they are equally delicious.

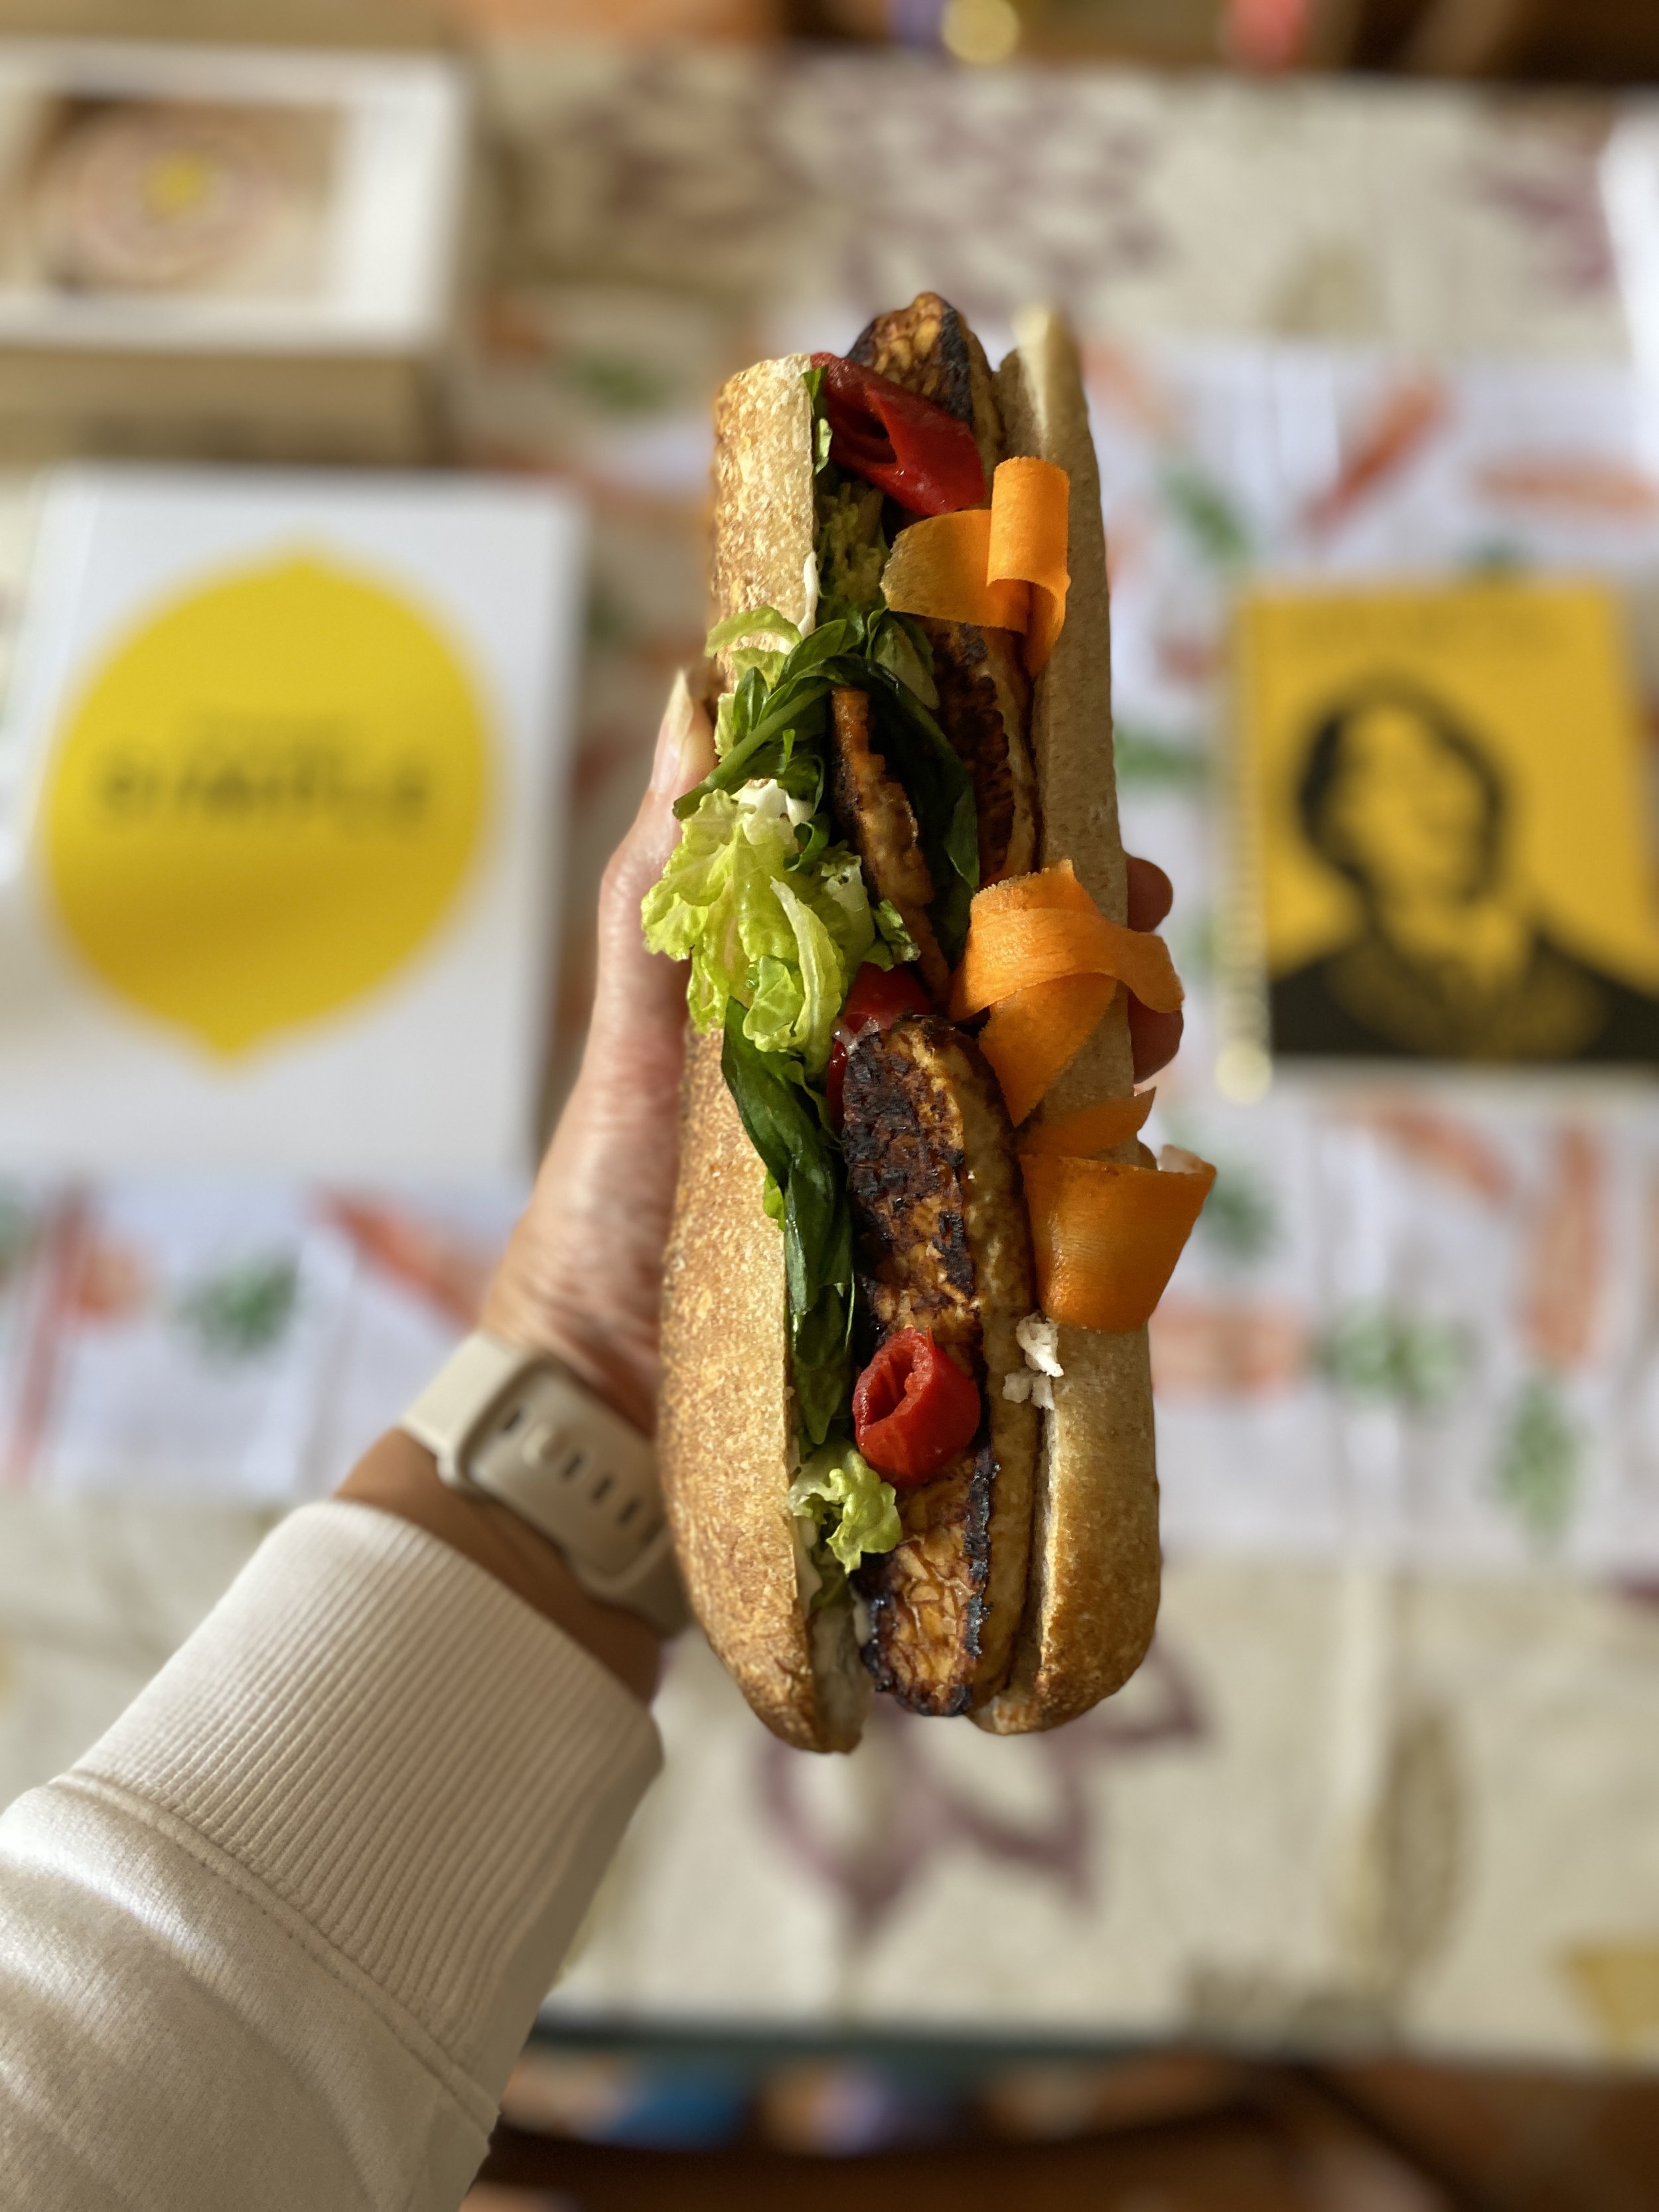
The combination of fresh baguette, a plant-based pate or cream cheese, tangy pickled vegetables, warm grilled tofu or tempeh, saltiness from soy sauce, freshness of mint and coriander and the bite of chilli make this an absolute flavour sensation. I think it’s the perfect WFH lunch.

Tofu (or tempeh) banh mi

For 2 people

1 x regular sized baguette (Hobartians, I like Imago’s wholemeal sourdough one), cut in half and then lengthways
150g firm tofu or tempeh, cut into four equal pieces
1 tablespoon soy sauce or tamari
1 tablespoon rice wine vinegar (or black vinegar, that you dip dumplings in)
A squeeze of lime juice
A pinch of chilli flakes
Plant-based pate or cream cheese (I have used Lauds’ cashew cream cheese and aged cashew cheese and they are both sensational on this - the aged cheese is probably more pate-like)
Fresh mint and coriander, as much as you like, shredded or chopped roughly
A handful of salad leaves or lettuce - today I used baby spinach and celery leaves out of my garden - shredded
Pickled vegetables such as carrot, cucumber and chilli (see note below)
Fresh chilli, if liked
Sriracha sauce, if liked

Prepare your baguette - if it’s a day or two old, you might prefer to toast it first.

You can marinate the tofu or tempeh slices ahead of time if you wish, it would certainly add to the flavour. But if you don’t have time, it’s fine. Just place the slices in a Tupperware container, then add the soy sauce, vinegar, lime juice and chilli flakes. Feel free to add any other flavourings you want, like minced garlic and ginger. Place the lid securely on top, turn gently a few times to get the tofu/tempeh coated in the marinade and then set aside.

Heat a small non-stick frying pan over a medium-high heat and once hot, using tongs, place the slices of tofu or tempeh in the pan. Sear on both sides. It will take 2-3 minutes each side.

Spread each of the baguette halves with the pate or cream cheese - you can also just use mayonnaise if that’s all you’ve got in. At this point I would add some kind of chilli condiment as well! Then place your fresh herbs, salad leaves/shredded greens and pickled vegetables on top of the baguette halves, bearing in mind that you will have to eat this with your hands and over-filling it, while tempting, might lead to a big mess later! Distribute everything evenly :)

With the pickled vegetables - I have a giant jar of pickling liquid in my fridge which has flavourings such as star anise, pepper, chilli, coriander seed and the base is rice wine vinegar, so it’s perfect for making pickled vegetables that go with this dish. Sometimes I have the vegetables ready to go from the fridge. Other times, I just get out the jar of liquid, peel strips off a fresh carrot and thinly slice a cucumber, and then put the vegetables into the liquid for 10 minutes while the tofu cooks. Then take them out with tongs or a clean fork and distribute to your liking over the baguette halves. Alternatively, you can just put freshly grated carrot and sliced cucumber on your baguette and skip this pickling palaver all together! But it’s fun, I promise! And you feel like a bit of a kitchen genius whipping out your fridge pickles at times like this.

Once the tofu/tempeh slices are ready, turn up the heat to high and pour the soy/vinegar marinade into the hot pan. It will sizzle and evaporate almost immediately, but give your tofu slices a bit of extra flavour and moisture. Plus, no waste! Alternatively, you can save the marinade in a jar for a stir-fry or something else later.

Using tongs, place the tofu/tempeh slices evenly on each baguette.

Add slices of fresh chilli and a drizzle of sriracha, if liked.

Press the halves together and eat straight away - not wearing your favourite top, and with napkins close by!


vegan mushroom stroganoff

vegan-mushroom-stroganoff-philippa-moore

It’s not the prettiest meal in the world, but it tastes absolutely divine! You can use any variety of mushrooms you have - and I think it would be equally nice with other spongy vegetables like eggplants or zucchini.

If it’s just me eating, I chop the mushrooms fairly roughly. If Tom is eating it, I chop them up quite finely (it’s a texture thing with him!). It will cook faster if the mushrooms are more finely chopped. Either way it will be delicious.

You can whip this up in about 20 minutes but with its velvety sauce and umami flavours, you’d think you’d slaved over a hot stove for hours. Enjoy!

Vegan mushroom stroganoff

Serves 2-3

Olive or coconut oil
3 large portobello mushrooms, chopped (see note above)
1 brown onion, finely chopped
2 garlic cloves, finely chopped
4-5 stalks of silverbeet or chard, finely chopped (stalks and leaves)
Sea salt and freshly ground black pepper (you will need LOTS of pepper!)
1 x 400ml can coconut milk
2 tablespoons brown rice miso paste
1 tablespoon tahini
1/2 teaspoon smoked paprika
Pinch of cayenne pepper
Vegetable stock powder
Fresh parsley and tarragon leaves, chopped, to serve
Basmati rice, to serve

Put the kettle on to boil.

Get a large saute or frying pan ( one with a lid) and add a splash of olive oil and place over medium heat. Add the mushrooms, onion, garlic and chopped silverbeet stalks and cook until they start to soften and brown slightly. Add a little salt and lots of freshly ground black pepper.

Continue cooking for a minute or two, then add the coconut milk, miso, tahini, paprika and cayenne pepper, and turn the heat up slightly, stirring everything to combine. Make some stock from vegetable stock powder and the boiling water from the kettle - I usually do this in the coconut milk can to get every drop of it out, and it’s a handy measurement too, you want about 400ml or just under. Add the stock to the pan, stir well and allow the pot to come to the boil, then reduce right down to a simmer.

Add more freshly ground black pepper if you like. Stir one more time to ensure nothing is caught at the bottom and then put the lid on and set your timer for 15 minutes.

Make your rice while it’s cooking.

After 15 minutes, add the chopped silverbeet/chard leaves, and stir well to wilt the leaves. Allow to simmer another minute or two, taste for seasoning (I usually add more black pepper here), and scatter with chopped parsley and tarragon. Keep warm if you’re waiting for your rice to be ready, otherwise get your serving spoon out!

Serve in bowls with steamed rice and a satisfied smile - for even the mushroom haters tend to love this one.

tinned tomato risotto

canned-tomato-risotto-philippa-moore

Super comforting, nourishing, delicious and on the table in less than half an hour. What more could you want from a bowl of food, I ask you?

If you have arborio rice and a tin of tomatoes in the pantry, you can make this. And once you make it, I’m sure you’ll make it again and again!

You can, of course, use fresh tomatoes in place of tinned if you prefer and have them handy, but personally I find the slightly concentrated flavour of the tinned ones adds so much to the richness of the dish - and evokes the canned tomato soup flavour of childhood that many of us find very comforting. In these strange times, comfort is something to prioritise, not just in cooking.

You don’t need to add cheese if you don’t have any or prefer not to, but little cherry bocconcini are a particularly good addition - a forkful of creamy, sweet and tangy rice combined with those delicious strings of melted mozzarella, it’s like a margarita pizza in a bowl!

Tinned tomato risotto

Serves 4 moderate appetites or 2 extremely hungry bushwalkers

Olive oil
1 onion, finely chopped
1 large garlic clove, finely chopped
A few large silverbeet stalks, chopped (reserve the leaves for later) [this is optional, I grow silverbeet so put it in everything]
2-3 teaspoons dried oregano and basil, or to taste
50g butter
2 cups arborio or carnaroli rice
Splash of red wine, white wine or cooking sherry (or even red wine vinegar at a push)
2 tablespoons tomato paste
1 x 420g tin peeled plum tomatoes
1 litre boiling hot vegetable stock, plus a little extra
Spinach leaves, silverbeet leaves, fresh basil or oregano, to serve
A handful of cherry bocconcini (or substitute any other cheese you have, ricotta is very nice)
A handful of grated Parmesan cheese, to serve
Salt and black pepper, to taste

Fill your kettle and put it on to boil.

Get a large saute pan - I use my Le Creuset shallow casserole dish, but I have made this kind of risotto in a stockpot before, just make sure you have a lid - and add a splash of olive oil and place over a medium heat. Add the onion, garlic and chopped silverbeet stalks and cook until they start to soften.

Add your dried herbs and butter, and once the butter has melted but not coloured, add the rice and turn up the heat. Get the rice coated in the butter. Keep an eye on everything so it doesn’t start to stick or burn but it’s crucial to have the heat high at this point.

Add a generous splash of wine and the pan should sizzle! Stir quickly to coat everything. Add the tomato paste and tin of tomatoes. You can use whatever tinned tomatoes you have but I prefer the whole plum ones because they have great flavour. You can break the tomatoes down with your wooden spoon as you stir.

Get your stock made and then pour a splash into the pan, as you would normally with a risotto. Stir well. Then add the rest of the boiling hot stock, maybe even rinse out the tomato can with boiling water and add that too. You can always cook excess liquid off, but a risotto with insufficient liquid is a disaster!

Stir well, ensure the rice and tomato mixture is entirely covered by hot stock and liquid. Bring to the boil. Add salt and pepper if you like (I often do it here and at the end). Stir one more time to ensure nothing is caught at the bottom and then reduce the heat to a simmer, put the lid on and set your timer for 20 minutes.

This is very unlike the traditional method of making risotto, but once you’ve successfully mastered cooking it this way, you’ll never go back!

You can come back and stir it occasionally if you like, but otherwise after 20 minutes it will be pretty much there. The liquid should have reduced (you still want some liquid, you don’t want it completely dry) and the rice should be tender.

Turn the heat off. Add your green leaves and fresh herbs and any cheese you’re using, and stir through to melt the cheese and wilt the leaves. You can leave it with the lid on again for a few minutes to do this if you like.

Taste and season, serve in wide bowls with a scattering of Parmesan on top and a few basil leaves if you have them.

Deeply satisfying and delicious, this risotto (or a variation thereof) makes an appearance at our table at least once a week. I hope you love it as much as we do!

healthy no-waste veggie burgers

philippa-moore-no-waste-veggie-burger

I had a favourite brand of vegetarian burgers that I’ve been buying since we moved here - Woolworths’ Macro Vegetable and Chickpea burgers. $4 for a pack of four. A delicious bargain.

Since the COVID-19 chaos kicked off, these burgers have been nowhere to be seen in any of Hobart’s Woolworths. They may well still be available on the mainland - perhaps Tasmania simply doesn’t have the vegetarian population to justify shipping them down! And let’s face it, for the last five months, I’ve just been grateful that most of my preferred items have been available. Veggie burgers are easy enough to make from scratch!

In constant pursuit of my no-waste policy, and Tom’s adoration of our “burger and chips night”, an alternative burger was created from leftover cooked brown rice, vegetables and a can of black beans. They are, I am not exaggerating, the *best* burger I have ever made at home. Add all the fixins, a pile of golden oven-cooked chips and you’ll wonder why you’d ever bother going out for dinner at all. Which, let’s face it, many people cannot at the moment. This burger is for all of you.

No-waste veggie burgers

Makes at least 12, depending on size

350g leftover vegetables (I used frozen mixed vegetables defrosted in a little boiling water then drained)
500g leftover cooked rice
1 x 420g can black beans, drained
100g fresh breadcrumbs
3 tablespoons wholemeal plain flour
2 tablespoons garlic powder
Fresh herbs, as much as you like (I used basil, parsley, mint, rosemary and thyme)
Sea salt and freshly ground black pepper, to taste

It couldn’t be simpler. Whack everything in a food processor, blitz until the mixture is pureed and the consistency of mince. You shouldn’t need to add any liquid at all, but you can add a splash of water or the bean liquid if it’s too dry and not coming together.

Wet your hands slightly and scoop out handfuls of the mixture and shape into patties. I use my egg rings to get them a fairly uniform shape and size (just spray the insides with cooking spray first).

You can either grill them straight away (if so, I would dust lightly with a little flour, depending on how wet the mixture is) or do what I do and freeze them in a large container with a layer of baking paper between them. I got 14 out of this mixture - two we ate straight away and I froze the remaining 12.

I cook them from frozen in a super hot oven (about 220 C), with the chips. The first side gets 20 minutes, then I take them out of the oven, flip them over and put them back in for 15 minutes. For the last five minutes, I usually put some cheese on top to melt and put them back in the oven for five minutes, together with the brioche buns (which I’ve usually had defrosting most of the day) to warm up.

This method gives the burger a nice crunchy exterior but the inside remains moist. I haven’t tried them on a barbecue yet but summer is just around the corner! I will report back.

“All the fixins?” I usually ask Tom at this point.

“Of course,” he responds.

So our burger fixins are - mayo, whatever relish or chutney I have open (this week it was the fiery apricot chutney I made in February), mustard, sauerkraut, baby spinach or rocket (or any salad leaves), pickled tomatoes, pickled chillies and a bit of basil pesto if there’s any kicking about. All piled on top of the burger in a (storebought) brioche bun. Sounds like a strange mixture but it’s all very delicious!

Enjoy!

zucchini and butterbean soup

Crumpets are a surprisingly delicious soup accompaniment.

Crumpets are a surprisingly delicious soup accompaniment.

While summer might have taken its last breath, weather-wise, down here, the zucchini are still holding strong. Continuing my fierce wish to make use of everything I have, I made this delectable soup with some thick-skinned zukes that were verging on marrowhood. It was so good it made me wish zucchini season would last forever.

Zucchini and butterbean soup

Makes at least 4 generous bowls

Oil and butter (sufficient to brown the vegetables, how much depends on desired richness)
1 small onion, finely chopped
1 garlic clove, finely chopped
1 small green chilli, finely chopped
650g zucchini (roughly two large ones), chopped
3 large leaves silverbeet, stems and leaves, chopped
1 x 420g can butter beans, drained
A handful of frozen peas (about half a cup, or thereabouts)
Stock of choice (vegetable, chicken or even old pesto jars rinsed out, or a combo of all three), to cover
Fresh dill, parsley, thyme and mint, a handful of each, chopped
Sea salt and freshly ground black pepper
A wedge of fresh lemon per person, to serve
Grated parmesan, to serve

I melted some butter in a saucepan for a different recipe and was so determined to use every skerrick of precious fat, that I decided I’d use the same saucepan to make the soup. To each their own. I added a splash of olive oil too.

Place the pan with oil and butter (in your desired quantity, but a tablespoon of each would be ample) on a medium-high heat and saute the onion, garlic and chilli briefly until they are starting to soften but not brown. Add the zucchini and silverbeet and cook, stirring fairly constantly, for a few minutes or until the vegetables start to soften and colour slightly.

Add the drained butter beans and frozen peas, stir to combine, then cover with the stock. I take this opportunity to rinse out any jars with only a teaspoon or so left in them (pesto is ideal for this recipe) and add that in too.

Bring the pot to the boil, then reduce to a simmer and cook for about 15 minutes until the vegetables are soft and completely cooked.

Add the fresh soft herbs, stir to combine, and cook a moment or two longer. Season to taste, then puree with a hand blender until completely smooth.

Ladle into waiting bowls, squeeze a little fresh lemon and sprinkle with a bit of grated Parmesan.

Savour, with some good bread (or crumpets) alongside.